.png)
What can you migrate?
Multiple Checklists for Jira are available for all hosting options - Jira Cloud, and Jira Data Center. The feature set and the user interface on all of those options are the same, which means that you can freely migrate to another hosting without any loss of features or the need to onboard users with the app again.
The migration guide for Jira is available here: https://support.atlassian.com/migration/docs/jira-cloud-migration-assistant/.
The following data will be automatically migrated from Jira Server/Data Center while using Jira Cloud Migration Assistant:
-
Checklists
-
Checklists history
-
Project templates
-
Global templates
-
Automations
-
Statuses
-
Settings
-
Permissions
Limitations
We do not support the migration of archived projects. Templates or checklists that are attached to the archived Jira project are omitted. If you experience any issues with migration, please ensure that the archived projects are unarchived.
Non-native Jira Workflow Functions are currently not supported by the Jira Cloud Migration Assistant. This means, they must be manually re-created on the cloud site if you’d like to continue using them.
This affects: post-functions, validators, conditions. Please note that if there was any Checklists-related validator added to a transition, such a transition of issue will not work on Cloud after migration until it is manually deleted and re-added.
Not all database encodings are supported during migration. You can still migrate your data, but with some encodings, language-specific or special characters may not be preserved correctly.
We currently test and support the following database configurations:
PostgreSQL:
Encoding | Collate
UTF8 | C
MySQL:
DEFAULT_CHARACTER_SET_NAME | DEFAULT_COLLATION_NAME
utf8mb4 | utf8mb4_bin
Before you start - which migration plan should you chose
To decide which migration option will be best for you, the first step will be to check how many Jira work items in total you plan to migrate. For this purpose, it doesn’t matter if the items already include checklists or not.
🟢 Option 1 - instances up to 50,000 Jira issues
It is the a safe size for migration of our app data. You can migrate it without additional preparation alongside Jira migration. Or separately as app data only.
-
Prepare migration, if you have archived projects with checklists, unarchive it for the time of migration.
-
Recreate projects post-functions, validators, conditions related to checklists on the new environment.
-
If any project fails, rerun the migration of that project alone, using the option to migrate app data only.
⚠️ Option 2 - instances up to 200,000 Jira issues
We recommend to migrate Jira data first and follow up with the app data later on with secondary migration of app data only. If the work items spread between your projects allows you to create 2 batches of 100,000 work items, then we recommend to do so. Otherwise, you can perform 1 migration of 200,000 work items.
-
Migrate your Jira Data Center to the Cloud instance, without Multiple Checklists app data.
-
Prepare checklists migration, if you have archived projects with checklists, unarchive it for the time of migration on both Data Center and Cloud.
-
Create a new migration, select app data only, and select projects you want to migrate.
If the issue spread between your projects allows you to create 2 batches of 100,000 issues, then it will be beneficial to do so. Otherwise, perform 1 migration. -
If the status is different than
100%. Read How to troubleshoot failed migration
-
Once it is done, recreate projects post-functions, validators, conditions related to checklists on the new environment.
⚠️ Option 3 - instances around up to 1,000,000 Jira issues
It will be best to migrate first Jira data without Multiple Checklist and follow up with secondary migration of app data only. For such high volume, it will be necessary to prepare migration plan before you start.
-
Prepare the migration plan: verify your data to get the exact count of work items and checklists in each project. This will help you keep track of the migration. Read how to verify your data
-
Group projects into batches of around 100,000 work items. Each batch should contain at most 10 projects.
-
Migrate your Jira Data Center to the Cloud instance, without Multiple Checklists app data.
-
If you have archived projects with checklists, unarchive them for the duration of the migration on both Data Center and Cloud.
-
Create a new migration, select app data only, and select the projects you want to migrate. Run each batch one by one.
-
If the status is different from
-
Once it is done, recreate project post-functions, validators, and conditions related to checklists in the new environment.
⚠️ Option 4 - instances above 1,000,000 Jira issues
Same as above, it will be necessary to migrate Jira first and follow up with app data migration separately. Multiple Checklists data must be migrated in batches. The steps will be same as in option 3, however we understand that it might be too restrictive for such large migration, so the acceptable batch size is 200,000 work items. Each batch should contain at most 10 projects.
-
Prepare the migration plan: verify your data to get the exact count of work items and checklists in each project. This will help you keep track of the migration. Read how to verify your data
-
Group projects into batches of around 200,000 work items. Each batch should contain at most 10 projects.
-
Migrate your Jira Data Center to the Cloud instance, without Multiple Checklists app data.
-
If you have archived projects with checklists, unarchive them for the duration of the migration on both Data Center and Cloud.
-
Create a new migration, select app data only, and select the projects you want to migrate. Run each batch one by one.
-
If the status is different from
-
Once it is done, recreate project post-functions, validators, and conditions related to checklists in the new environment.
The efficiency of the migration depends on the total volume of the work items. That is why, we strongly advise to migrate in smaller batches up to 200,000 work items for the most effective results.
To make it simple, the more Jira work items are included in a migration package, the longer the process will take and more prone to errors it is. As an example, migration of just Multiple Checklists data for 3,000,000 Jira work items will run for approximately for 14 days.
Smaller batches can make a difference to streamline the process and minimize the risk of errors.
How to migrate data
Create migration
No matter which way you choose to migrate, the steps are the same.
-
Create a new migration
-
Configure everything the same way as you migrated your projects: use the same destination Cloud site and the same migration stage.
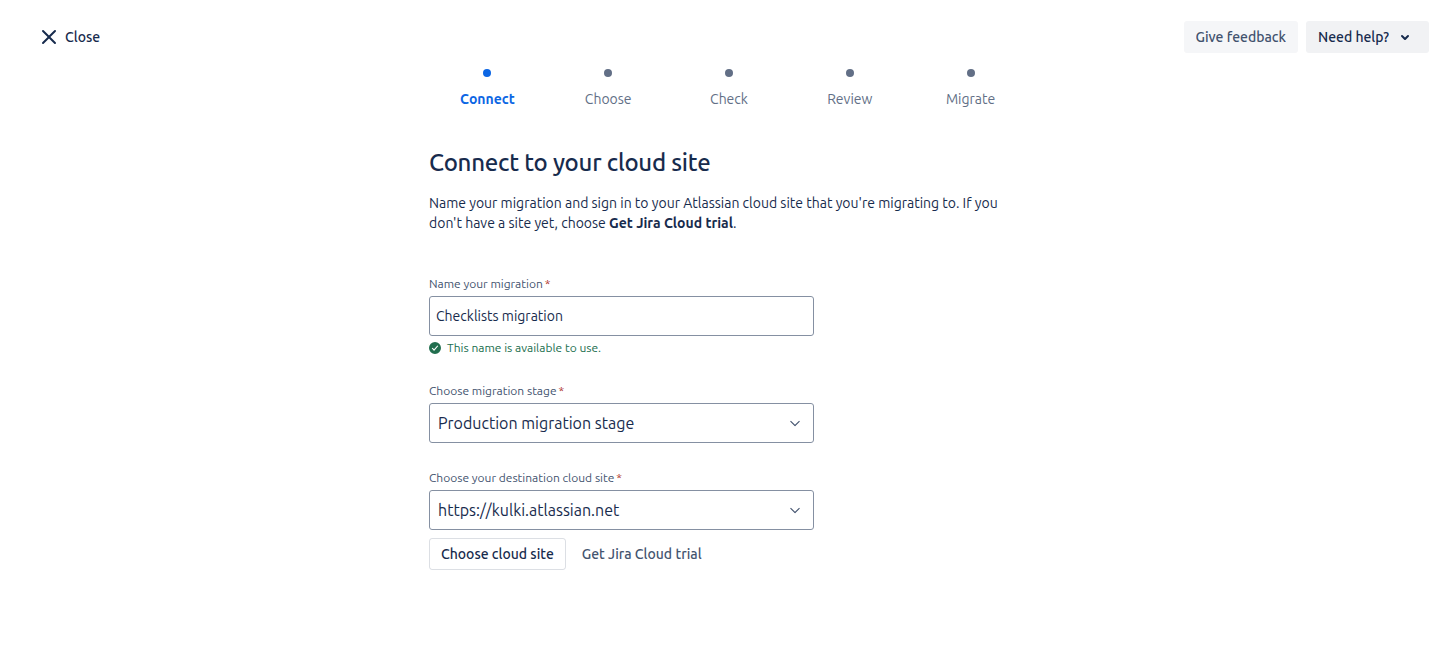
-
Click Choose migration options
-
Click Select in the projects section.
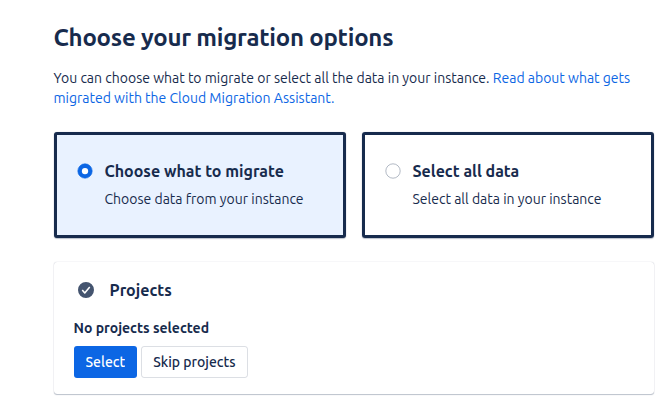
-
Select App data only.
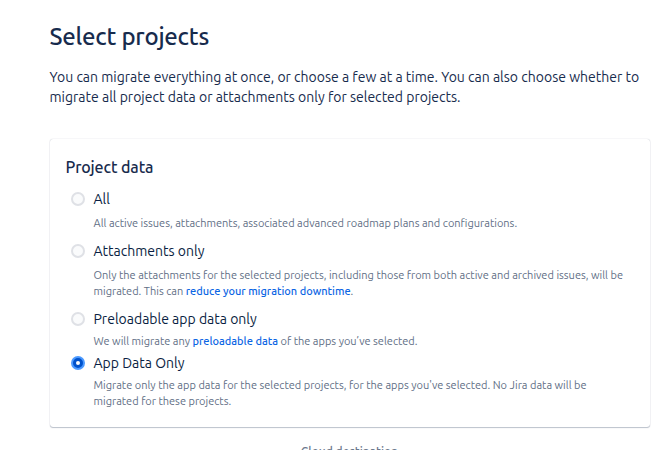
-
Select the projects you want the checklists to be exported from.
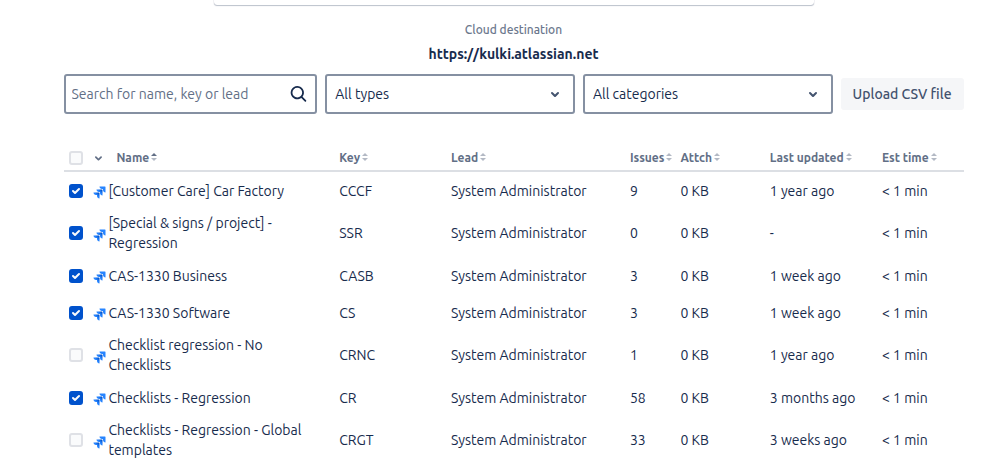
-
Continue with the migration
If you select App Data Only, the work items you already migrated will not be altered in any way except for the checklist data. These data are: issue properties and the Checklists progress custom field.
Please be aware that migration replaces the checklist data present on your cloud.
If you are already using cloud instance before migrating app, the changes made in checklists will be reverted to the state from the Data Center.
For example, if you have a Task A-1 with Template A and added new checklist items to the Template A. After migration the changes will be removed to fit the exact state that was at the Data Center.
Multiple Checklists migration progress bar won’t update until the end of migration. This is an expected behaviour. Unfortunately, we can’t influence the Jira UI, so the progress bar will be stuck at 0% until the migration is done.
Migration workflow and what Passed means
Checklist migration works the same whether you migrate it alongside projects or as app data only, so you can decide whether to migrate both at the same time or separately.
When migrating data, be aware that we OVERWRITE existing data. For example, if your users started using your cloud instance before migration finished, you risk replacing their checklists or templates with your DC version.
Migration starts by moving all your Settings, Templates, Automations, Statuses, and Permissions. This shouldn't take long, even on instances with thousands of users.
Most of the time is spent migrating checklists and checklist history. We move project by project, work item by work item, and migrate the data. At certain times, we log progress in the logs(more about it in the section logs below), where you can see the current progress.
Important: what we consider a passed migration.
We try to migrate every checklist, but sometimes a work item can be deleted, which prevents the checklist from being added. We decided that problems like this will NOT stop the migration and will instead be logged as a warning in the log file.
Another similar problem is when a project is restricted from Checklists, and we don’t have permissions to either view or edit work items in this project. A similar approach applies here. We log it as a warning and do not stop the migration.
Log file
Log file holds the information on progress and errors of Multiple Checklists migration.
How to access it?
1 Open the migration
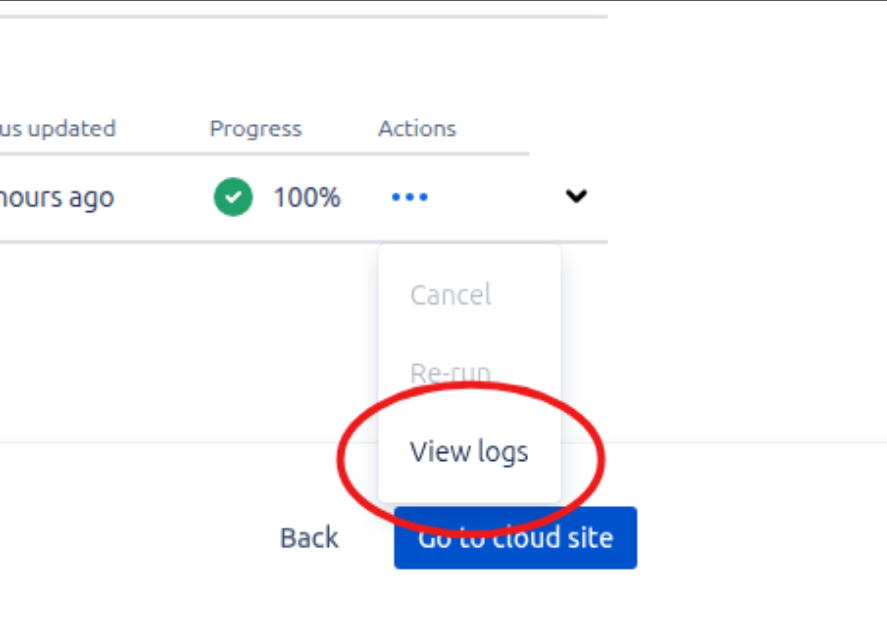
2 Open the app migration menu (highlighted below)
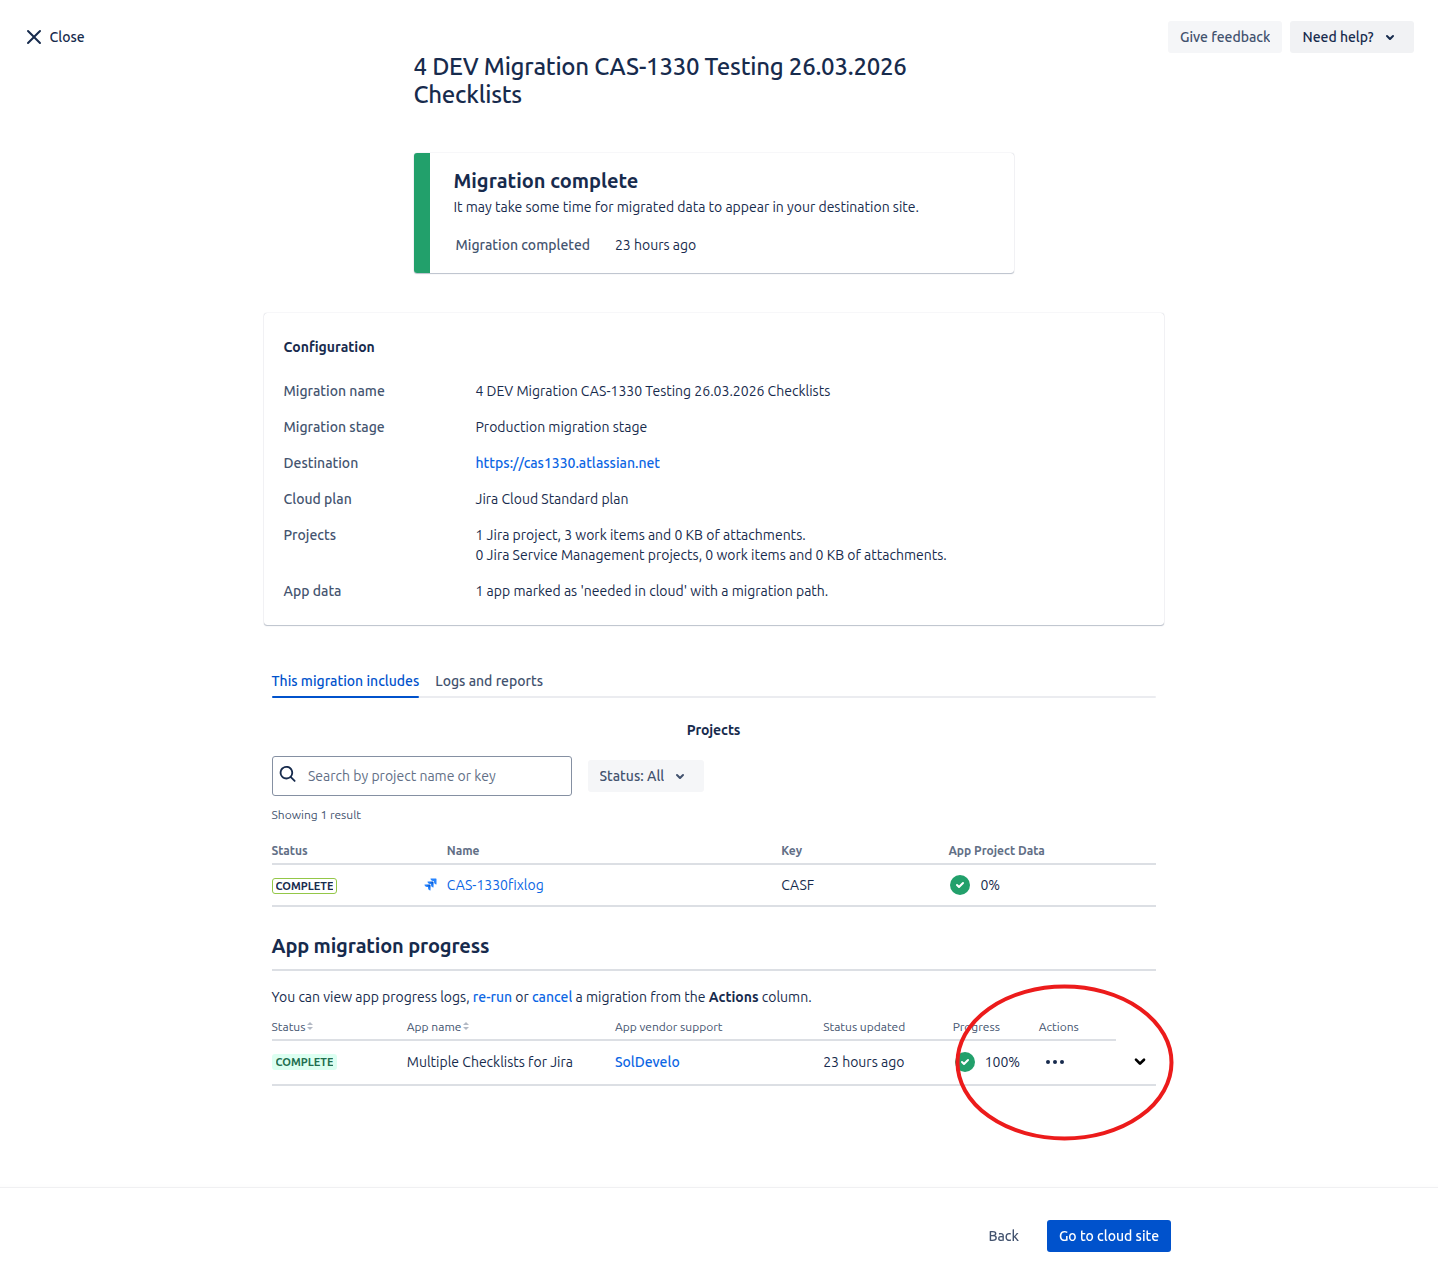
3 Download logs
4 Open with tools like Excel
General info
During or after migration, a log file with the current status is available to you. We recommend downloading it at least once every 4 hours because of Jira DC limitations(where the log file is cut after ~4.5 hours, and you can’t preview old messages).
What can you find in a log file?
Status
Status: IN_PROGRESS | Progress: 16 | Message: globalTemplates
First is the line that should show up very often. It tells you the status, Progress percent, and what is currently being migrated.
Problematic work items
[Issue data migration] Failed issues checklists migration. Likely by missing permissions or not existing on cloud: 10334
It tells you which work items we had problems migrating. The most common cause is the work item being deleted/moved on the cloud, or our app not having edit and browse permission to a project.
Important note
Please be aware that we try to migrate work items up to 4 times. Sometimes the logs can show 100% while we are still trying to migrate the problematic work items. It happens when a lot of work items encounter this problem. If it happens don’t worry, and give us a few more minutes to complete all tasks.
How to verify my data
You can do an SQL search which will allow you to learn on the number of work items in each of your projects and if there are any checklists data that needs to be migrated.
Before you proceed you will need:
-
Jira Admin access to your Data Center.
-
Knowledge about SQL.
-
Access to Database.
Below are the recommended SQL searches which will help you gather information needed to select combination of projects to migrate in each batch.
-
Count the number of issues in each project
SQLSELECT project, COUNT(id) AS count FROM jiraissue GROUP BY project ORDER BY count DESC; -
Count the number of issues in each project, but the results will show project key and name instead of ID.
SQLSELECT p.pname AS project_name, p.pkey AS project_key, COUNT(ji.id) AS count FROM jiraissue ji JOIN project p ON p.id = ji.project GROUP BY p.pname, p.pkey ORDER BY count DESC; -
Count the number of checklists in a project.
SQLSELECT project, COUNT(id) AS count FROM jiraissue WHERE id in ( SELECT entity_id FROM entity_property WHERE property_key = 'sd-checklists-0' ) GROUP BY project ORDER BY count DESC; -
Count the number if checklists in a project, but the results will show project key and name instead of ID.
SQLSELECT p.pname AS project_name, p.pkey AS project_key, COUNT(ji.id) AS count FROM jiraissue ji JOIN project p ON p.id = ji.project WHERE ji.id in ( SELECT entity_id FROM entity_property WHERE property_key = 'sd-checklists-0' ) GROUP BY p.pname, p.pkey ORDER BY count DESC; -
Select issue keys to be verified by the script. It can and should also be split into projects to avoid the costly script check.
SQLSELECT p.pkey || '-' || ji.issuenum AS issue_key FROM jiraissue ji JOIN project p ON p.id = ji.project WHERE ji.id in ( SELECT entity_id FROM entity_property WHERE property_key = 'sd-checklists-0' ) ORDER BY issue_key DESC;
How to troubleshoot failed migration
Before you reach out to us, the most common issues that you can check are:
-
Please double check, if you have selected projects to migrate while starting your migration.
-
If some projects were omitted in migration, please double checked if they weren’t archived. We do not support the migration of archived projects. Templates or checklists that are attached to the archived Jira project are omitted.
-
Make sure that you divided your migration to smaller batches accordingly to Before you start section
Running validation script
When your migration fails, rarely it means that nothing was done. We have prepared a script for you, so that you can verify which data has to be retried. The script will tell you which Jira issues has properly migrated checklists.
Requirements
Admin access to Cloud and DC
-
The script is included in the .zip package above.
-
Readme — Read it before use; it contains detailed instructions on how to run the script.
-
VerifyChecklistsMigration_light.js — A lightweight version recommended for Cloud instances that are not yet in use.
-
VerifyChecklistsMigration.js — A robust version recommended for Cloud instances that are already in use.
-
Config — Contains all setup details, including the URL, login and password for Data Center, and the email and API token for Cloud.
-
Prepare a JQL search. The script will use it to verify whether the checklists were migrated correctly.
Our team will be more than happy to assist you and troubleshoot the issue alongside with you. There are information which you can prepare beforehand, which will give us a lot more insights to what went wrong:
-
Your instance URL
-
What was the outcome of the migration (for example, 99% and failed, or 100% but missing).
-
How much data were in the selected projects, namely the total number of all issues, not only those with checklists.
-
If you are already actively using the Cloud instance to which you want to migrate.
With those information you can reach our support team here.
FAQ
How long will it take to migrate Multiple Checklists?
The way it works is that our app needs to go through all migrated Jira issues and verify the data which needs to be migrated. That is why the time needed to complete migration depends on number of issues being migrated.
You can calculate the time needed to migrate using the following formula:
-
-
Formula:
NUMBER_OF_ISSUES /9000 + 1 hour = X hours
-
|
Part |
Meaning |
|---|---|
|
|
All issues in batch, regardless if they have checklists or not |
|
|
Converts time spent per issue to hours |
|
|
Fixed overhead |
Example: For 200,000 issues, the migration will take approximately 23 hours.
The migration is running for hours but it is still stuck at 0%
Don’t worry this is expected behaviour. Unfortunately, we can’t influence Jira UI, therefore, the migration statuses which you will see are:
|
0% |
Migration is in progress. |
|
50% |
Migration failed, there is a serious error that needs to be verified. |
|
99% |
Migration mostly completed, there are some errors that needs to be verified and fixed. |
|
100% |
Migration completed, checklists are successfully moved. |
If you are still concerned, you can download the logs during the migration. It includes information on a percentage done. We can also verify on our end if we see the ongoing migration. In such case please contact our support team here.
My migration failed at 99% (or any other percentage)
When migration fails, it means that it wasn’t able to successfully move all information that you requested. However, almost always there is some data that has been properly migrated. To resolve that, first you are going to have to verify what is missing and has to be retried. To do so, use our script. You can read more about it in How to troubleshoot failed migration.
I have completed the migration and it shows 100%, but some issues are missing.
It should be very marginal situation that we recommend fixing manually. We recommend running our script to verify which data is missing. You can read more about it in How to troubleshoot failed migration.
I have archived projects, what should I do?
Unfortunately, we can’t support migration of archived projects or issues. Please unarchive it for the time of migration. Otherwise, the data won’t be migrated.
What is the recommended batch size?
Migration of Multiple Checklists efficiency relies heavily on the number of issues being migrated. For the best results we recommend to migrate batches accordingly to the size of migration:
|
Number of Jira issues to be migrated |
Recommended migration path |
Batch size |
|---|---|---|
|
Migrate checklists data alongside other Jira data |
Not needed. |
|
Migrate Jira data first and follow up with secondary migration of Multiple Checklists app data only. |
If possible, migrate 100,000 issues per batch; otherwise, up to 200,000. |
|
|
100,000 work items. Each batch should contain at most 10 projects. |
||
|
200,000 work items. Each batch should contain at most 10 projects. |
I have migrated the app data, but nothing was migrated.
Please double check if you did select any projects in your migration. If you just click to migrate the app data, without selecting projects no checklists will be migrated.
I have made a mistake, my migration will take days to complete. How to stop the migration?
There is no button to pause or cancel the migration. As a workaround, you can uninstall Multiple Checklists from your Data Center. It will stop the migration. We store data in Jira issues properties. Therefore, no data will be lost by this.
Why is it so slow? Can I make it go faster?
The performance of the migration depends not only on our abilities or connection but is also limited by Atlassian architecture on Cloud. There are limits on APIs calls which our app can make. While it is useful to ensure performance in regular app usage, in terms of migration it poses challenge due to which migration will take more time. You can read about APIs limits in Atlassian developer documentation here.
Do you have any questions or feedback? Feel free to contact us here 💡